Showing posts with label birthday. Show all posts

Friday, August 28, 2015

Mint and Gold Party

You know what they say if you are throwing a party. If it can go wrong, it will. 


In this case, I decided to get ice cream cake. You know, because this birthday party had a mint color scheme and mint chocolate chip ice cream is awesome. Notice there is no cake on that cute little cake stand from Hobby Lobby.


That's because ice cream melts. Especially on a hot day in May.


It melts very quickly, actually.


So we took it out, snapped one quick picture, and put it back in the ice chest.


Where it melted anyway.


But it tasted great.

I filled apothecary jars with mint chocolate chip meringues from Tuesday Morning, pearl gumballs, and Ferrero Rocher with the stickers and bottom wrappers taken off. They were perfect with the gold streamers we sewed and fringed. (Want some? Convo me on Etsy @ SissyBoomsPartyRoom.) A milk glass footed bowl was filled with brownie bites.


I made a mini picture banner with tags from Target Dollar Spot and Teresa Collins frames with Instax mini Polaroid pics. I cut out letters on mint paper to spell Happy Birthday.

The goody bags were from Target and Target Dollar Spot. I believe these were part of the Christmas stuff. Inside the treat bags was a L'oreal lip gloss from Dollar Tree and Jamberry nail stickers.


My daughter had to have the milk bottles with mint chevron paper straws and chalkboard labels. She added paper flowers from Michael's and labeled them with each guest's name with mini gold alpha stickers from the Dollar Spot. 

The tassels are Teresa Collins.


Invitations were mint and gold dot note cards from Target Dollar Spot with Party spelled out in more mini alphas. I just printed the party info on labels and stuck them inside. Super easy. Also added a few gold sequins to the envelope.


Monday, September 8, 2014

Graduation and Birthday Combo

My daughter's birthday and my sister's graduation happened to fall on the same day this year, so we decided to let them share a party.


Paper cups were used as a target for Nerf gun competitions.

I love the mint green bike Jordan got for Christmas and it went with the decor, so I used it as a backdrop of sorts.


The gift table was decorated with a paper chain. I love pulling out furniture at parties that coordinates with the decor. This little antique table was the perfect green color. I think maybe it was a child's table, but I'm not sure. It is too low to be a side table, but higher than coffee tables.


Thank you gifts were tiny magnetic clipboard note pads from Michael's. I love the yellow ombre crepe paper.


Of course, we had to have some old pictures of the graduate to embarrass her.


I combined a banner from a Studio Calico kit with Neapolitan scrapbook paper to make more of an impact.


Party lollies were easy to make from the Dear Lizzy kit to stick in candy buckets.


The cake was simple with a miniature Happy Birthday banner. I love these! My mom made the cake, of course.


My daughter seems to leave a trail of Calico Critters wherever she goes. I found this one in front of the paper chevron straws. She loves all small things. Wonder who she gets that from?


Remember this bucket from the baby shower? We used it to ice down root beer.


Cookies made by Aunt Mandy were a huge hit. I didn't even get a chocolate one!

Linked up at lollyjane.com.

Posed Perfection

Sunday, July 20, 2014

Hot Air Balloon Party


First birthdays deserve a great party. Don't you agree?


What could be cuter than a hot air balloon theme for a party?


Custom hot air balloon invitations were made with Dear Lizzy paper and vellum. We put pictures inside of baby girl in the basket above.


I mean seriously. Miniature hot air balloon mobile? Cute!


Up, Up, and Away Banner? Super Cute!!


Custom DIY hot air balloon decor by Jordan? Super Duper Cute!!! Down to the miniature tassels hanging from the twine wrapped basket.


Monogrammed goodie bags stufffed with-what else?-hot air balloon tissue paper! Inside the treat bags were gift cards to the Cookie Company. I love that idea by Jackie.


Twinkle lights, pennant banners, hot air balloons made from paper lanterns with washi tape stripes and baker's twine string. Uber Cute!!!


I think every party should have chevron and striped paper straws. Even if nobody actually uses them. And  a cute little mini bucket to put sharpies in so guests can write their name on a cup and not waste another one when they lose it in the mix of everyone's cups of delicious punch.


Balloons to draw attention and make it obvious where the party was taking place. Did you know Dollar Tree sells balloons??


Birthday lollie with a paper straw stick. To die for!


Friday, April 25, 2014

ABC Birthday Party

This one loves letters, so we threw an ABC party.


Which means you need a custom door hanger instead of a wreath.


And a handmade ABC mobile with letters cut out with the Cricut machine hung with baker's twine. 


And of course, goodie bags decorated with patterned paper.


And a huge M. What is it about monograms?


Especially really big ones. Look closely (even though it is fuzzy because my $300 flash wasn't working.) It is decoupaged with tiny letter squares cut out of the scrapbooking paper.


And a DIY Birthday banner!


And a cake with letter confetti strewn on the table. I love table scatter.


And fruit kebobs. I love the word kabob. Or kebab. Jury's out on how to spell it.

This custom birthday party was so fun to create!!!


To make the door decoration, I used this scoring board, which I purchased myself. In my honest opinion, it is not necessary, but it is helpful in keeping the folds evenly spaced. I don't always use it, but when I make something for other people, I do.

Friday, May 31, 2013

Art Party

This year, the girl birthday party was at Arts on Fire, a pottery painting place. Each guest gets to paint a piece of pottery of their choice and keep it. Love that!


These handmade art party invitations were pretty easy to make, but a little time consuming.  I cut out artist palettes on tan cardstock and let the birthday girl paint the splotches on the invitations. (This party is not about me and my perfectionist tendencies after all!) The paintbrushes were cut with a Cricut electronic cutting machine cartridge that was actually an old fashioned ink pen and we just added the brush tip over the pen nib and drew lines for bristles. My little girl actually thought of that one. Printed labels were added on top with party info. Oh and that perfect circle for the artist's thumb? Used a circle punch. These fit in the card envelopes from Office Depot. Love those too!


The birthday girl painted her own cake stand. Again, OCD was not allowed to creep in. Another pretty cool cake by Andi (my mom.) Inside was rainbow and I can't believe it, but I don't think I got pics of the inside. 
Would you believe the purple icing faded from the sun through the windshield on the twenty minute drive to the party locale?? It was MUCH brighter! Wear sunscreen folks. UV rays are harsh!


Art Party goodie bags had colorful gumballs inside. Remember, they also get to take home pottery.


My newly nine year old wrote "Thank You" on the teeny tiny paint sets from Party City that we tied to the bags with cute ribbon. We used Souffle pens from Michael's to write on the plastic. Those pens are pretty cool. They write on almost anything but you have to be patient and let the ink pool. I think I may have to decorate my cell phone cover...


Thursday, April 4, 2013

Monster Mash

Disclaimer: None of this was my work, but it is still cute.


Monster cake.  I love how the cake stand looks like little legs. I wonder if they planned that?  Of course, they did. (They being my mom and sisters.)
That colorful tabletop is nothing more than crepe paper streamers run in a crisscross pattern.


Monster cupcakes. Because who could resist red chevron cupcake holders?? And candy eyeballs?


Treat Station. With baby snacks. This party was for a one-year-old, so these are age appropriate snacks, like Trix and animal crackers (which are not crackers but cookies in case you have never had one, in which case you should have more variety in your foods. Or not. They don't taste that great.)


Treat bags. Say "Thank you for coming" with handmade felt monster bags. And handmade tags. With all sorts of monster goodness inside. 


Treats. Like monster band-aids. And a monster cup. That red thing? Obviously it is used to make homemade popsicles. And a handmade reusable zipper bag WHICH was filled up at the treat station with whatever you like. So if you don't like animal not-crackers then don't put any of those in your own personal baggie. But please wash and reuse as often as you like.

not pictured: unicorn suckers which look monsterish somehow


Wednesday, May 30, 2012

Owl Party

Yoo-hoo!  It's that time of year again!  Time for a birthday party! 

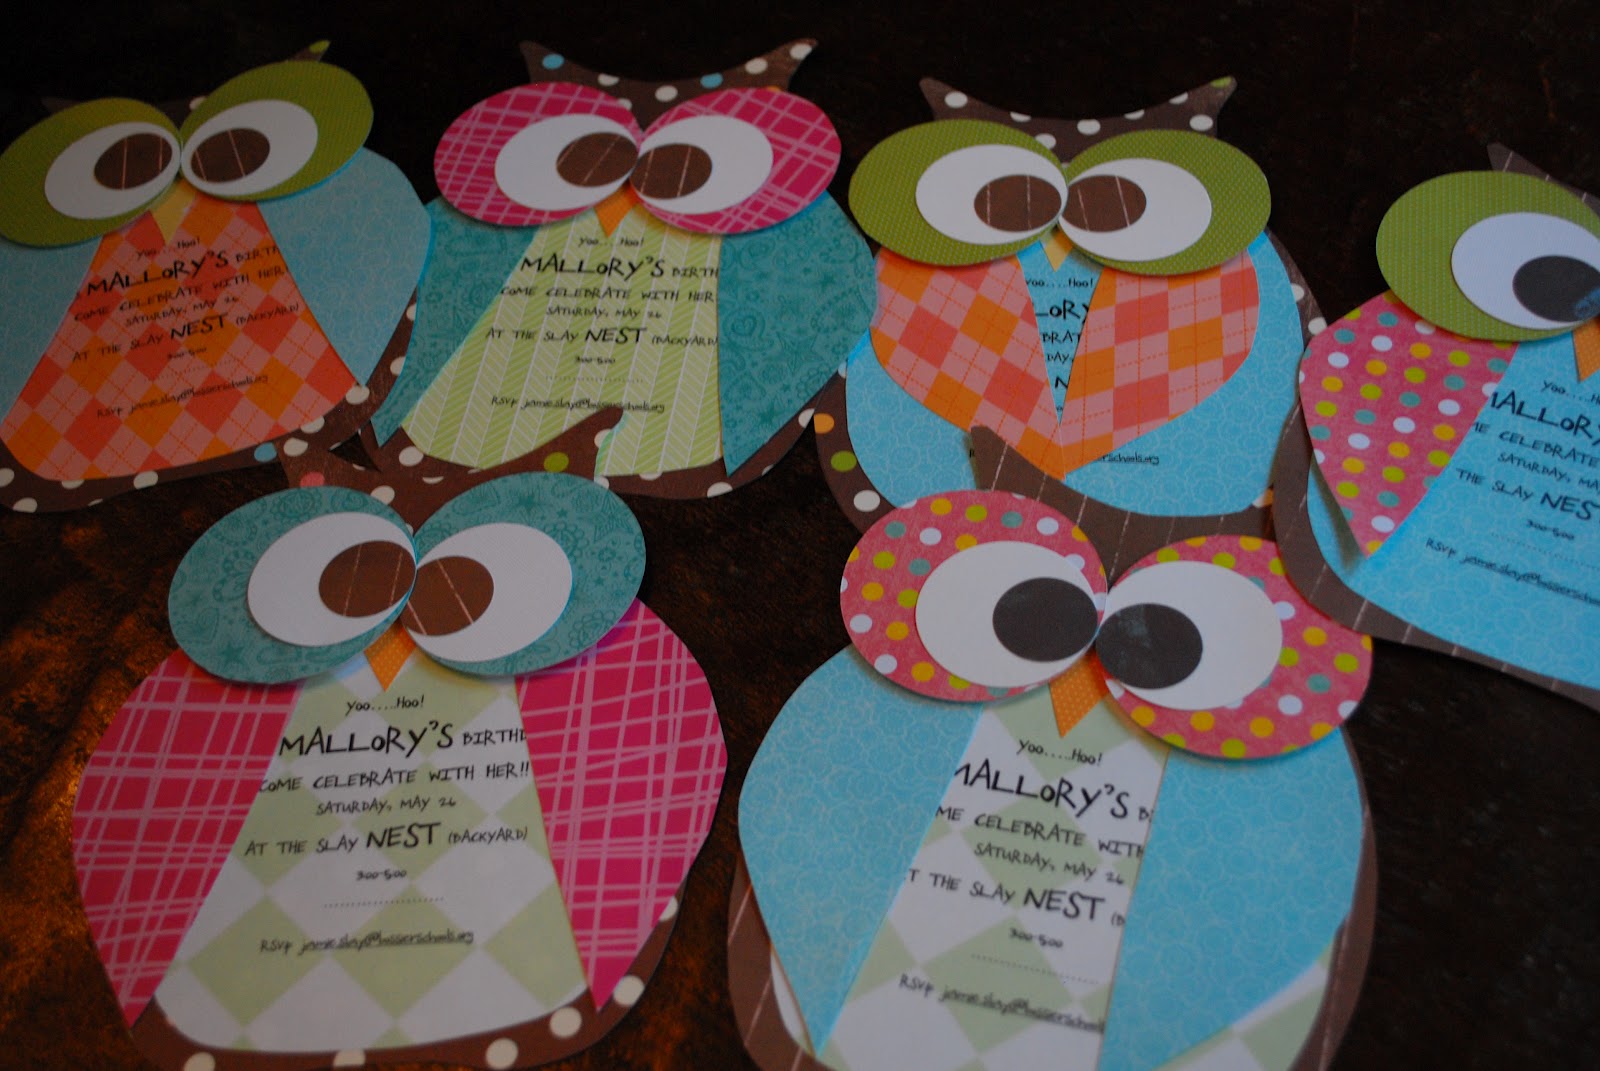
With all of the cute owl stuff out there, I could not resist doing an owl party.  I made these owl invitations to match.  I love how the wings move by using mini brads.  (I actually had to do that so they would fit in the envelope.) 


                    Foam squares under the eyes make them pop.  Inspiration came from here.


So glad I decided to use a round table this year.  I found the plastic tablecloth at Target and was so happy that it was long!  (That is not a cute table under there.)  The napkins were held down with a wooden 8 from Hobby Lobby.  The forks were contained in a small flower wall vase, which I have a small collection of.  My sister, Jena, and I made the  circle streamers with a circle punch, scrap paper,  and sewing machine.


Good thing my mom knows how to make cakes, cause I am not prepared to dish out big bucks for something that gets eaten!  The owl on top was a cookie. 


This is one of my favorite birthday banners ever.  I used real doilies under the letters for more texture. The letters were cut with the "Vintage Findings" cartridge for the Slice machine.  I love this color scheme.  Love the long satin ribbons (my sister's idea.)  The best part?  I already had all of the supplies for it! 


Treat bags this year were a lot of work, but I loved them!!   I stole the birdcage idea from a friend at work. She had a very similar cage with a chalkboard stuck in at a baby shower. I thought it would make a perfect spot for the goodie bags (since owls are birds, after all). 


Party favors were paper owls sewn together to form a pouch with friendship bracelets and bottlecap magnets inside. The kids had to rip them open to get the treats.


You can't see it, but the little card said, "It's been a HOOT!" My daughter wrote those, and made the magnets with owl stickers and Glossy Accents (sold at Michael's.)


This "Use Your Noodle" game didn't work so well.  Turns out, balloons don't like heat or dried out spiky grass.  The kids had other games to play, thank goodness.  But man, that was a lot work putting "M" stickers on those and cutting noodles. The important thing is, it was cute, right?


Owl Make and Take


I found this idea on Pinterest.  I tried to make a link, but could not find this project.  You just hot glue the top of the toilet paper tube down to make the shape of the owl.  The kids get to paint and decorate.  I used scraps of paper for wings and beaks and bought colored eyes from Michaels. 


The ice block was a hit!  I filled a plastic container with enough water to cover several trinkets and let it freeze.  I then added another layer of water and toys and let that freeze.  The problem was that the sides would melt when you poured more water on it, so we had to lift out the block, put toys and water under it, and then freeze again.  This takes several days to complete.  I bought a meat tenderizer for the kids to take turns breaking the ice.  The tool broke after a few hits.  I bought the $5 one from Target.  Maybe a more expensive one would work or just a hammer.  I didn't think an ice pick would be a good idea.  An adult (or several) needs to stay close to supervise so that no one gets hurt.