Showing posts with label Dollar Tree. Show all posts

Friday, August 28, 2015

Mint and Gold Party

You know what they say if you are throwing a party. If it can go wrong, it will. 


In this case, I decided to get ice cream cake. You know, because this birthday party had a mint color scheme and mint chocolate chip ice cream is awesome. Notice there is no cake on that cute little cake stand from Hobby Lobby.


That's because ice cream melts. Especially on a hot day in May.


It melts very quickly, actually.


So we took it out, snapped one quick picture, and put it back in the ice chest.


Where it melted anyway.


But it tasted great.

I filled apothecary jars with mint chocolate chip meringues from Tuesday Morning, pearl gumballs, and Ferrero Rocher with the stickers and bottom wrappers taken off. They were perfect with the gold streamers we sewed and fringed. (Want some? Convo me on Etsy @ SissyBoomsPartyRoom.) A milk glass footed bowl was filled with brownie bites.


I made a mini picture banner with tags from Target Dollar Spot and Teresa Collins frames with Instax mini Polaroid pics. I cut out letters on mint paper to spell Happy Birthday.

The goody bags were from Target and Target Dollar Spot. I believe these were part of the Christmas stuff. Inside the treat bags was a L'oreal lip gloss from Dollar Tree and Jamberry nail stickers.


My daughter had to have the milk bottles with mint chevron paper straws and chalkboard labels. She added paper flowers from Michael's and labeled them with each guest's name with mini gold alpha stickers from the Dollar Spot. 

The tassels are Teresa Collins.


Invitations were mint and gold dot note cards from Target Dollar Spot with Party spelled out in more mini alphas. I just printed the party info on labels and stuck them inside. Super easy. Also added a few gold sequins to the envelope.


Monday, November 3, 2014

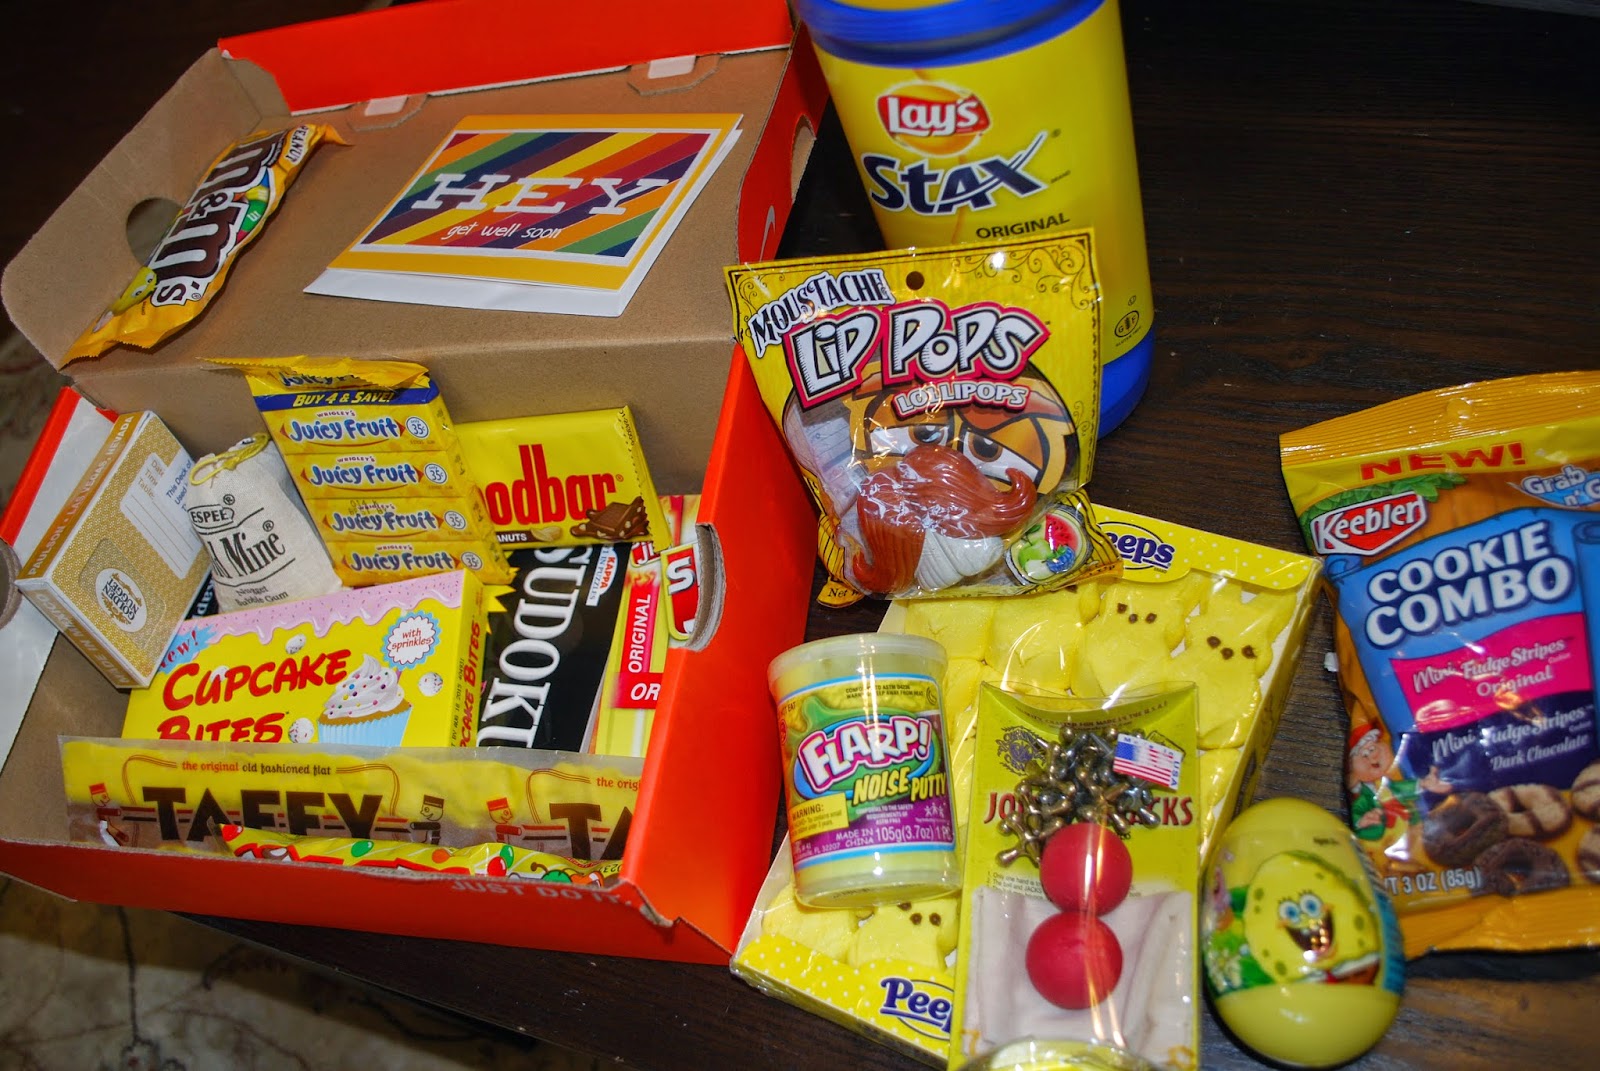
Send a Box of Sunshine

I hate ever having a reason to send this particular type of care package, but sometimes life happens.


I can't think of many things worse than a child being sick enough to require a hospital stay. When a kid you know isn't well, why not brighten their day by sending a box of sunshine? Just fill a box or basket with all sorts of yellow goodies and a card. I found yellow noise putty, moustache lip pops, jacks, a sack of gold mine gum, and yellow candies at Hobby Lobby. Dollar Tree had yellow snacks as well as cards and a sudoku book for mom and dad and other adults. The box was wrapped in yellow paper and mailed to the hospital.

At first, I tried sending something from the hospital gift shop, but there just didn't seem to be anything that this kid would really enjoy. With this care package, there was bound to be something in there he would like with enough to share with siblings and other relatives staying in the hospital with him.

Make someone's day by sending them a box of sunshine!

Just a Girl and Her Blog

Tuesday, September 30, 2014

Halloween Home Tour


My ten year old daughter says yesterday, "It hurt so bad! It's like a ghost came up and tased me!" 
Hmmmm. I can totally relate. 
No, I can't. 
She was referring to...a paper cut.

Not even sure how she knows what a taser is. Probably listening in the car to the Walton and Johnson Taser Report with her Dad, which is probably not appropriate for kids.
But it is pretty funny.

Now on to the Home Tour. Where you won't find any ghosts. Or tasers. 


As much as I hate the TV above the fireplace, it just had to be placed there. I decided to opt for more seating, so the only blank wall has a chair and cobbler's bench. You can see the post for how to make the BOO banner here.


I got the old books from the FREE bins outside the new store in town called 2nd and Main and just tore off the covers. They are vampire books, which is cool for Halloween, but no one will ever notice. Mwah mwah. On the candlestick, I layered more copper scrubber from Dollar Tree over the black netting that was formerly packaging for mini skulls and added a silvery pumpkin on top.


Here is a secret I learned from my days as a Display Designer for Stage Department Store. (Yea, I got to dress the mannequins, too. Pretty fun job. Except the part where you have to carry a REALLY tall ladder around the store without taking out any customers.) 
Your items should form a triangle. 


If your display seems a little blah, it may be that all of your objects are too similar in height and you can't place them in a triangle formation. It they are all tall, or all small, it just isn't as pleasing to the eye.


My daughter loves this witchy Halloween vignette on the cobbler's bench my husband's grandfather made. She read the potion book and added her own touches like the poison apple that she took a bite of , mummy dust in the vintage vials from my father-in-law's days as a Chemistry teacher, and old hag's cackle (aka red kool-aid.)  Of course, every good witch needs apothecary jars and drawers full of creepy things like skulls, scorpions, and centipedes (also from Dollar Tree). EEK!


I found an old book with an orange cover and black spine at Goodwill to make the witch's potion book. Tim Holtz distress ink was used to make it look old after spray gluing the printed spell pages over the book pages. This idea came from g*rated with a printable.


It's not Halloween without pumpkins and big ole spiders. Especially glittery and gold leaf pumpkins.


These metal spiders look like the ones in the Pottery Barn catalog, except I only had to pay $4 for these because I found them at Ross. Preeeetttty excited about that.


Here is where the chalkboard lives from an earlier post and even earlier post. And you can see the tutorial for the skull centerpiece here.


This display is a little bit of lagniappe (a little something extra.) I had a small brass tray that I found at Goodwill for $3, another pewter goblet from Goodwill stuffed with old dictionary crinkle paper topped with a Dollar Tree pumpkin, a raven also from Dollar Tree, and miniature flags that I made years ago.


Don't tase me, Bro!!


Just a Girl and Her Blog
Linked up at snapcreativity.com and 3boysandadog.com and knickoftime.com and www.wecallitjunkin.com.

Wednesday, September 3, 2014

Halloween Skull Centerpiece

Remember those Dollar Tree Halloween Finds I showed you last week? Here is the first project I made using the glitter skull.


Mypinterventures.com is having a Fall Dollar Store Craft Contest and I decided to try my hand at it.


So I made another trip to the Dollar Tree.


Can you believe all of these items were close to a dollar each? 

The items you will need are:

Glitter Skull-Dollar Tree
Craft Foam Sheets-Dollar Tree
Copper Scrubbers-Dollar Tree or Fred's Dollar Store
Black Crepe Paper Streamers-Dollar Tree or Fred's Dollar Store
Orange Cupcake Liners- Fred's Dollar Store
Dictionary or book-Dollar Tree or Fred's Dollar Store
Paper Doilies-Dollar Tree
Black Glitter Ribbon-Michael's dollar ribbon bins
Spider Web Place Mat- Ross for $1.99 (They have great decor right now!)
Candlestick-Goodwill for $1 (I looked for them at three dollar stores and they were all out. Dollar Tree normally has glass ones that would work as a pedestal for this. I spray painted this one. You can see it in its former life here.)


I started by making the top hat using a sheet of orange craft foam. I didn't have any black because I used it all on a different project. I cut a strip 2 inches wide.


Next, I traced a circle onto the craft foam with a ribbon spool and cut it out. This will be the base of the top hat.


Then, I rolled the strip of craft foam into a 1 1/4 cylinder and glued it closed. Let that dry and glue the cylinder onto the base circle. Cut a circle to fit the top of the cylinder. I used a 1 1/4 inch circle punch but, you could use something to trace if you don't have a punch.


Glue the top circle onto the hat and trim with ribbon. Set aside to dry.


While the hat is drying, work on the other trimmings. Cut a circle from scrap cardstock, poster, or cardboard. It doesn't have to be black because it won't show. It just needs to be a good bit smaller than your doily. This is just a base to glue down your black crepe paper ruffle.


Ring the edge of your cardstock circle with glue and smoosh crepe paper making sure it is slightly smaller than the doily but bigger than the bottom of the skull so all the layers will show.


Rip a few pages out of the dictionary and make a lolly. 


I would tell you how, but Rhonna Farrer does an awesome job on her video which you can find here.


Unroll the copper scrubber and cut it down the center. I used my Tonic scissors, but you can probably use old scissors or wire cutters if you don't have them.


Wear work gloves to pull the copper apart then smash it back together until your "nest" is the size you want it based on your candlestick. This is metal and will cut your hands when you pull, so wear gloves, be careful, and take your time. I LOVE the shimmery effect! It's worth the effort.

The last step is to hot glue each layer down. I didn't glue down my copper because I use the candlestick for my apothecary


I love the finished Halloween centerpiece for your table or fireplace mantel.


I made a slightly more expensive version with lace trim on the top hat and spider web wired ribbon. I love both!


Dolen Diaries

Thursday, August 28, 2014

Dollar Tree Halloween Decor


Look what I found at Dollar Tree! Halloween decor for my Halloween vignette. I love the word vignette and I NEED to have one this year. Only problem is I need a flat surface. I don't think I'm going to find a console table OR a buffet for a dollar though. Mwah mwah mwah.  


I know it's early, but you might want to get out and get some of this Halloween goodness for your own personal vignette before somebody else gets your fair share. 
(See how I worked the word vignette in again. That's just good editing right there.) 

Stayed tuned to see where this ends up! Update*** You can see my Skull Centerpiece here.


Saturday, October 27, 2012

Yoda Pumpkin


Does your school or community host a Pumpkin Light Night? or Pumpkin Shine? All of the classes and individual students decorate pumpkins and line the track around campus. The kids get another chance to wear those expensive Halloween costumes and jump in the bounce houses and eat junk food.


I am always amazed at the creativity that comes out that night. Folks go all out.

Pumpkin Light Night theme for my daughter's class is Yoda this year.  Not Star Wars. Just Yoda. Here is our version. We even added foam ears and white feathers from a boa, all from Dollar Tree.  Gotta love Dollar Tree.
The key to painting faces is not to use black paint for the outlines. A better choice is a darker hue of the face color. I ran out of the green paint, so I ended up using a light brown color, which still works better than black. Black is too harsh and unnatural.

P.S. One tip for decorating pumpkins:  Wash the pumpkin first to remove the waxy coating.  The paint sticks much better. And use krazy glue, not hot glue. 
OK, that was more than one tip.  It's your lucky day.


Monday, October 24, 2011

Cat Pumpkin

(Scene:  Pumpkin Decorating)

Me:  What are we going to use for whiskers?

Her:  Maybe we could use some of those long fuzzy things we used last year for the antennas on the Lil' Pet Shop Pumpkin.  What are they called?  Toilet plungers?

Me:  (Thinking.)  You mean pipe cleaners.

Her:  Oh yeah.  Let's use those.


Pumpkin Light Night is fast approaching and we needed to decorate a pumpkin or two quickly. 
This year, the theme was book characters.  We chose the book by Laura Numeroff, "If You Give a Cat a Cupcake."  We had to have some sort of sign or poster to display as well, so we made ours look like the book cover (complete with real sprinkles.)  We already had red letters from a Christmas scrapbook kit (thanks Aunt Sandy!)


The pumpkin we chose for the cupcake was a little too big, but I thought tiny pom-poms (thanks Mom!) were cute as sprinkles.


Note to self:  Next year, buy black foam sheets MUCH earlier than the week before Halloween, cause they run out in stores and buying a huge multi-colored pack when you only need two small ears is not my idea of cost effective, plus now I will have to store it probably for years, cause I cannot throw something out that I MIGHT use.

(We never found anything to use as whiskers.  No black wire.  No clear fishing line.  Just not gonna use toilet plungers.)


Thursday, March 17, 2011

Top O' the morning to ya!

 Around here, St. Patrick's Day means Crazy Hat Day at school.  A trip to Dollar Tree resulted in this creation.  Paper napkin flower with a shamrock in the middle.  Learned how to make these here.  Can't really tell it's a shamrock?  Well, that's because I glued it on the way out the door this morning with the hot glue gun that was left on all night.  Yep, all night.  Bad thing is, it's not the first time that I was just waiting on it to heat up and forgot about it.  (This is part of why I don't enjoy cooking, btw.  I tend to forget about hot things while they are getting hot.) Last time sparks were involved.  
This is probably why I am walking around with naturally frizzy hair lately.  I abused my flat iron one too many times. Good thing the world needs perfectly imperfect parents!

Friday, October 8, 2010

Halloween teacher gifts

I like to get unexpected gifts. So I like to give unexpected gifts.


Just a little something, to brighten someone's day. These Halloween treats went to my coworkers and my daughter's teacher. I took the label off a Frapuccino and called it Spooky Serum. 


Fall candy corn looked like Crow's Feet. Sort of.


A jar of lemonheads was labelled Poison No. 94. I found jars at the dollar store.


Target had these little eyeball bubbles which were perfect for Eye of Newt.

Green tomato salsa became Ghoul Drool. I found these labels at Target several years in a row. 

Make someone's day today!